Why a fish bowl is a great first setup
Building an aquarium from scratch does not require you to go on a panic-driven YouTube rabbit hole that eats your entire Sunday. Something like a Betta fish bowl setup is affordable and beginner-friendly. Plus, it is satisfying to watch the ecosystem thrive once the water parameters are in place.
If you are just starting off, the groundwork to set up the ideal water condition is crucial. Adding fish before a setup is ready for them will lead to them dying. Thus, in this blog, we’ll discuss how you can understand and build a thriving ecosystem for your first fish bowl.
Understanding the Nitrogen Cycle in a Fish Bowl
What is the Nitrogen Cycle?
Fish eat the food nature produces (microorganisms) and then produce excreta. Then, nature goes back to breaking this down into CO₂ and ammonia, eventually converting them back into fish food.
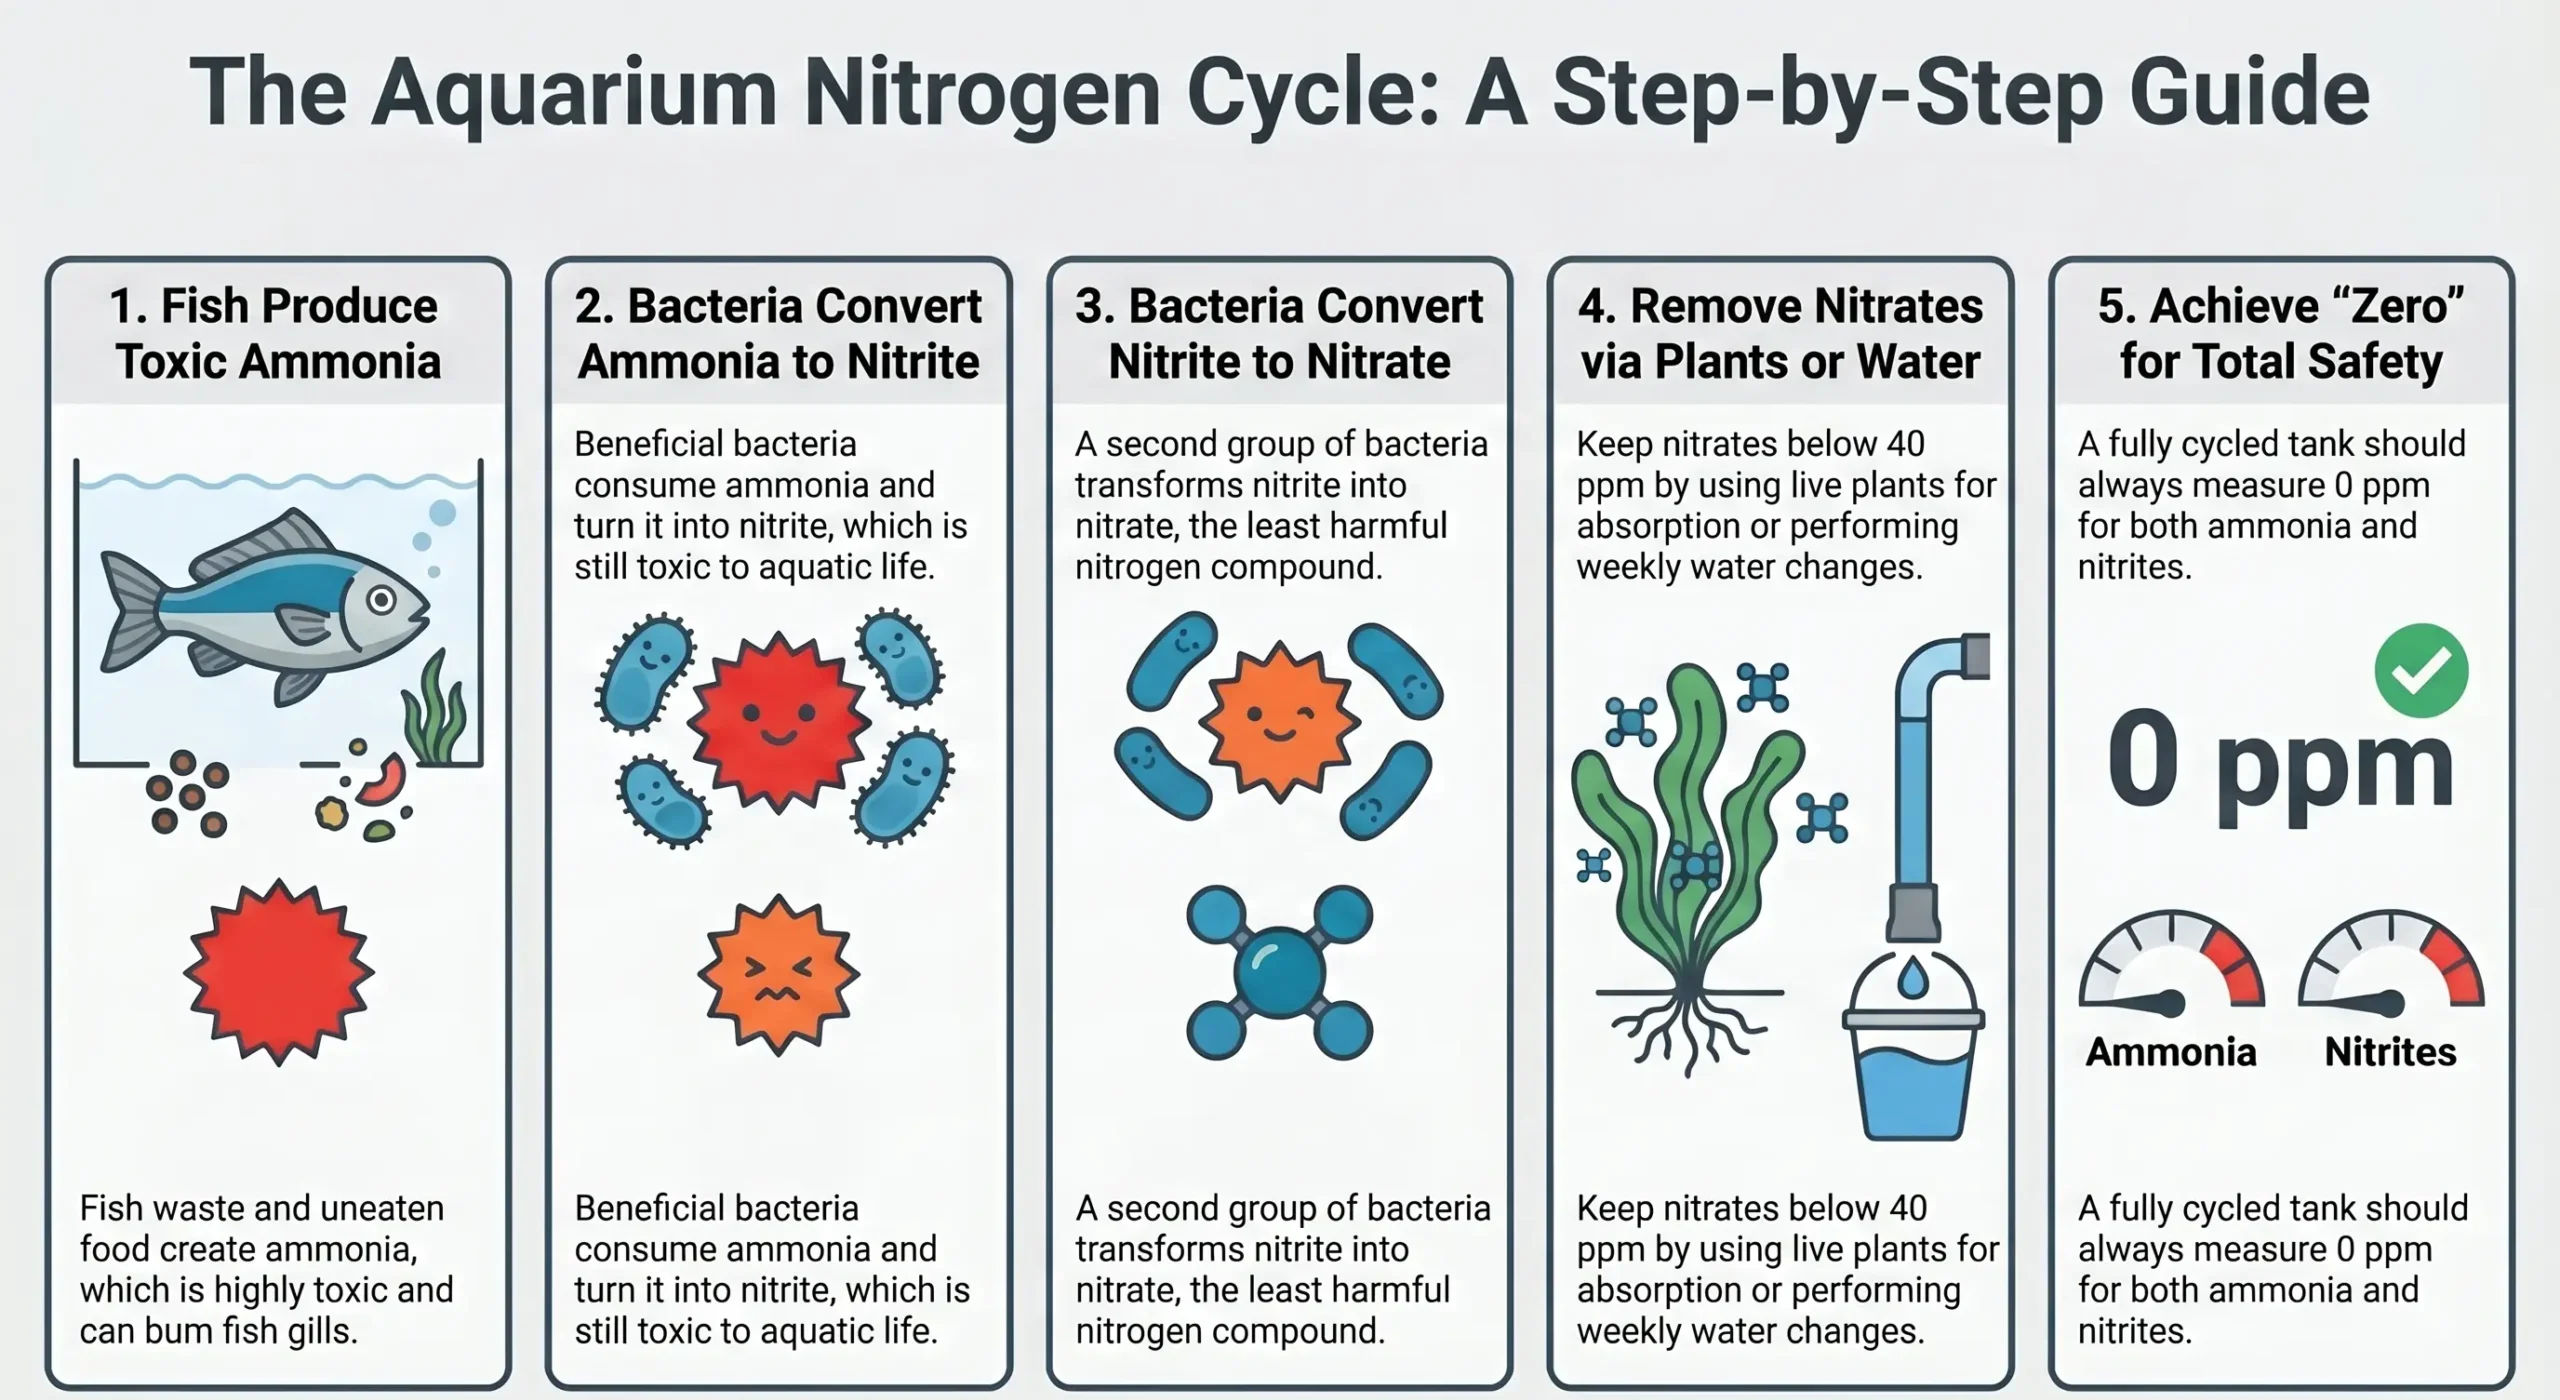
In a healthy, cycled tank, we need an artificial setup that mimics the converting properties of nature, also known as beneficial bacteria, to ensure that these nitrogen compounds don’t kill your fish. The ones that will help us accomplish this are:
- Nitrosomonas bacteria, which convert ammonia into nitrite.
- Nitrobacter bacteria, which convert nitrite into nitrate (non-toxic in small quantities like our setup). They are absorbed by live plants and cleaned through regular water change.
The goal of our tank setup is to get a nitrogen equilibrium of ZERO ppm (parts per million) ammonia and nitrites, which is toxic to livestock. Keep in mind that these chemicals are colorless and odorless, making it hard to notice if something went wrong and leading to the death of your fish.
Why It Matters Before Adding Fish
First things first, beneficial bacteria need to establish themselves before your fish are introduced. Like we mentioned, fish eat food and excrete in the form of ammonia. If there’s no ecosystem in place to clean it up, your fish will get sick fast, and most beginners won’t know why. Experts call this the “new tank syndrome,” and it’s the reason most first-time fishkeepers lose their fish within two weeks of setup.
How to Cycle Your Bowl (Fishless)
Cycling is the process where we give time for the bacteria to grow before your fish move in, like setting up desks in a classroom before the students arrive for their first day of school! Here’s how you do it without fish involved at all, which is the safer method.
First, fill the bowl with tap water. Then add 1 to 2 drops of dechlorinator per gallon of water, which eliminates the chlorine present in our water. Chlorine destroys the bacteria we’re trying to establish, so this step is important. Now you need something to feed the bacteria as they grow. A pinch of fish food works. Drop some in every couple of days and let it break down into ammonia. That ammonia is what the bacteria feed on.
Finally, test the water every few days with a testing kit for ammonia, nitrites, chlorine, and pH. You’ll watch it crash to zero over two to four weeks. Once both reach zero and nitrates show up, the bowl is cycled. Congratulations! Your fish can now go in.
Choosing the Right Bowl for Your Fish Tank Setup
Minimum Size Recommendations
The easy answer is not to buy a fish bowl below 12 inches in diameter. Smaller bowls are a nightmare to maintain because water chemistry goes sideways fast when there’s so little water volume. A larger water volume gives you more room for error, which you’ll appreciate when you’re starting out since water parameters remain more stable.
Glass vs. Acrylic
Glass stays clearer over time and doesn’t scratch from regular cleaning. It is also more affordable. Acrylic, however, is lighter and won’t shatter (especially if you have butterfingers), but do note that it scratches easily. As your first fishbowl setup, glass is a safer choice.
Shape and Surface Area
A wider opening at the top means the water can actually breathe. Oxygen gets in and CO₂ gets out. A narrow-necked vase looks nice on a shelf but slowly suffocates whatever lives in it because gas exchange at the surface gets restricted. Go for a wide mouth, always.
Setting Up Substrate for Your Fish Bowl
Best Substrate Options
Substrate is just the layer of material sitting at the bottom of your bowl. It is also the area where most of your beneficial bacteria live. And, if you’re planting, it’s also what feeds your plants.
- Fine gravel is the most forgiving starting point. It’s easy to rinse, water moves through it without compacting, and bacteria colonize it well. Sand looks more natural, and some fish genuinely love sifting through it (bettas especially tend to rest near it), but it packs down over time. You do need to stir it every few days, though, since pockets of stagnant water form underneath and produce toxic gases after a while.
- Aqua soil is the best option if you’re going for a planted fish bowl. It’s packed with nutrients that feed plant roots directly and breaks down slowly over months. The downside is it clouds the water for the first day or two after setup, and it’s pricier than gravel or sand.
- Bare bottom, meaning no substrate at all, is the easiest to clean. The trade-off is bacteria have nowhere to colonize, which makes cycling slower and the bowl ecosystem less stable overall. Ideally, this is not something you should explore as a beginner yet.
For a planted bowl, a setup that works well will have an aquasoil base layer and then fine sand on top. The sand keeps the water clear and gives plant roots something to grip while the soil underneath feeds them.
How Much Substrate?
For a fish-only bowl, 2 to 3 centimeters of substrate is usually enough. For a planted bowl, go 5 to 8 centimeters so roots have real depth to anchor into. A shallow substrate means plants uproot every time you disturb the water, so be careful about the quantity.
Rinse Before Use
Whatever substrate you pick, rinse it before it goes in. Like washing rice, run it under plain tap water thoroughly, swirl it around in a bucket, pour off the cloudy water, and repeat until what drains out is completely clear. This removes dust and fine particles that would otherwise cloud your bowl for days.
Not even a small amount of soap or cleaning products should touch your fish bowl set-up or substrate. Residue from detergent lingers in the substrate and kills fish in ways that are genuinely hard to trace. Use plain tap water only, all the time.
Adding Live Plants to Your Fish Bowl or Aquarium Setup
Why Live Plants Help

Plants in a fish tank take in nitrates (fish waste) and help keep the water clean and balanced. They also release oxygen into the water, which fish need to breathe, and give fish spots to hide and feel safe. If the fish are always stressed, they get sick more easily. Thus, having live plants in a fish tank is helpful because they take care of your fish, both physically and mentally.
Best Plants for Fish Bowls
- Java Fern: This is one of the best plants you can buy. It doesn’t need much light and provides hiding and resting spaces that fish genuinely use.
- Anubias: This species grows slowly, needs low light, and adds oxygen to the water while reducing harmful ammonia and nitrite levels over time.
- Marimo Moss Ball: This is technically an algae, but it functions the same way as a plant in a bowl. It absorbs nitrates, needs almost zero care, and fish seem to enjoy resting near them. Rotate it occasionally, though, so all sides get light.
- Water Sprite: As a fast-growing stem plant, it pulls excess nutrients out of the water quickly and keeps algae in check. It is a good option for newer bowls where water parameters are still finding their balance. Just trim it regularly before it takes over the entire bowl space.
- Hornwort: Fast-growing plants like hornwort lead to faster nutrient absorption. Keep an eye on it and trim regularly so it doesn’t block light or crowd the swimming space of your fish. It is a good option for bowls prone to algae issues.
Planting Tips
- Java Fern and Anubias: Both are rhizome plants, meaning they anchor through a horizontal stem rather than in the substrate. To plant, tie them onto a piece of driftwood or a rock using cotton thread or a rubber band. The thread dissolves in a few weeks once the plant has attached itself. After that, it holds on its own.
- Marimo Moss Ball: Just drop the ball into the bowl. It doesn’t require much light, so placement doesn’t matter much, but give it a gentle roll every few days so all sides get even light exposure.
- Water Sprite and Hornwort: As stem plants, these should be buried 3 to 5 cm deep within the substrate. Both can grow very rapidly, which is useful for nutrient absorption but means you need to trim them back regularly. In a bowl, fast-growing stem plants will hit the surface and spread across it if you ignore them for a few weeks, which blocks light for everything underneath and cuts off gas exchange at the surface. The recommended trim time is when they reach about two-thirds the height of your bowl.
P.S. All these plants should line the sides and back of the bowl, not in the middle, so your fish have enough space to breathe, eat, and move around without feeling constricted.
Choosing Livestock for a Betta Fish Bowl Setup
Is a Betta Right for a Bowl?
Betta is one of the few fish well-suited to a bowl setup. They have a labyrinth organ that lets them breathe air directly from the surface, which means they tolerate lower oxygen levels better than most species. According to Bettafish.org, optimal water conditions for Bettas sit between 76 and 82°F. Keep the water warm and the bowl adequately sized, and a Betta will do well.
Also remember, only one male Betta fish per bowl. Two males in the same space will fight until one of them is dead.
Other Suitable Species
- White Cloud Mountain Minnows are small, active, and one of the hardiest fish out there. They can be kept at room temperature without a heater, which makes them genuinely low-maintenance for a bowl setup. Keep them in a group of at least five or six since they get anxious alone.
- Endlers tolerate a wide range of water parameters, including pH levels spanning from 6.5 to 8.5 and almost any water hardness, which gives beginners a lot of room for error. If you have males and females together, you will have fry within weeks, so keep that in mind before mixing sexes in a small bowl.
- Neocaridina Shrimp are excellent clean-up crew members that eat algae and leftover fish food, which helps keep a bowl stable between water changes. Only add them once your bowl has been running for at least a month, since they need an established biofilm to graze on.
- Nerite Snails eat algae off the glass and substrate without touching live plants, and they need brackish water to reproduce, so there’s zero chance of overpopulation in a fishbowl setup. But they tend to climb, so keep the water level a couple of centimeters below the rim, or they will escape.
Stocking Rule of Thumb
Here’s a rough guideline most beginners start with: for every one gallon of water in your tank, you can have one inch of fish body length. In a 5-gallon bowl, you’re looking at about 5 inches of fish, which is about one or two small Bettas.
That’s why we suggest going big on the size and water capacity if you want a small fishbowl or aquarium setup. Less water means ammonia builds up faster, and there’s less room for the chemistry to stay stable.
Lighting Your Fish Bowl
Do Bowls Need a Light?
For a fish-only setup, a light is optional. For a planted bowl, it is not. Plants need light to photosynthesize and absorb nitrates. No light means plants die, decompose, and spike the ammonia levels you just spent weeks getting to zero.
Best Light Options
A clip-on LED between 5 and 10 watts covers most small bowls. USB nano LEDs are something you can explore since they are inexpensive and easy to reposition. Avoid incandescent bulbs, as they produce heat that destabilizes water temperature in small volumes.
How Many Hours Per Day?
A planted bowl requires exposure of about 8 to 10 hours each day. We suggest you use a plug-in timer and stop thinking about it. Consistent light schedules reduce algae buildup and also mean less stress on your plants.
Fish Bowl Maintenance Routine
Water Change Frequency
A water change just means removing some of the water from your bowl and replacing it with fresh, treated tap water. This is done to dilute the waste and nitrates that build up between cleanings.
How often depends on whether you have a filter:
- No filter: Remove and replace 25 to 30% of the water from your bowl every three to four days.
- Small sponge filter: 20 to 25% removal once a week is enough.
Before the new water goes in, add a few drops of dechlorinator (about 1 to 2 drops per gallon of water). Tap water contains chlorine, which kills the beneficial bacteria you spent weeks building during cycling. A small bottle of dechlorinator costs almost nothing and lasts a long time. Keep it next to the bowl.
Cleaning Without Disrupting Bacteria
The goal here is to remove visible waste without killing the bacteria living in your substrate and filter. A turkey baster works well for sucking up waste sitting on the substrate. A small gravel siphon does the same thing but more thoroughly. Either way, never use soap or any household cleaner on anything that goes near the bowl.
If you have a sponge filter, clean it by squeezing it out in a cup of old tank water you’ve already removed during the water change. Never rinse it under the tap. Tap water kills the bacteria living inside the sponge, and that bacteria is the whole point of having the filter.
Testing Water Parameters
Once a week, test for ammonia, chlorine, nitrate, and pH with a testing kit. Write the results down somewhere. The reason is simple: if something goes wrong, you can start by comparing – if this week’s numbers are different from last week’s.
Conclusion
Maintaining a fishbowl, especially a betta fishbowl setup, is actually not that hard. The majority of the work is required in the initial stage of the setup. You just need to get the nitrogen cycle right, pick ethically sourced livestock suited to the space, and keep the water parameters consistent. The thriving ecosystem you’re after only takes a few weeks of effort and patience to establish after this. And we promise you that it’s worth the wait!
FAQs
What is the best fish bowl setup for a betta?
The expert-approved, best fishbowl setup for a Betta fish consists of a 2.5-gallon or larger glass bowl with a heater maintaining 76 to 82°F, a couple of low-light plants, and one male Betta.
How do I cycle a fish bowl before adding fish?
Fill the bowl with treated tap water, then add a small pinch of fish food every couple of days. Test the water every few days with a liquid test kit. You’re watching for three things to happen in order: ammonia rising, then nitrite rising, and then both dropping back to zero. When ammonia and nitrite both read zero and nitrate shows up for the first time, the bacteria colony is established. Now, your fish can go in.
Can you set up a fish bowl without a filter?
Yes. A planted bowl with regular water changes can maintain optimal water conditions without filtration. For a fishbowl tank setup without a filter, it will require 25 to 30% water swaps every three to four days.
What substrate is best for a fish bowl setup?
Aqua soil or aqua soil mixed with fine sand for planted bowls is the standard, while fine gravel is recommended for fish-only setups. Rinse everything thoroughly before it goes in, though.
How often should I clean a fish bowl?
Every three to four days if you don’t use a filter, and once every 7 days if you have a sponge filter. Remove waste with a turkey baster during each change and test parameters weekly.